Entries Tagged 'Furniture' ↓
December 26th, 2010 — Furniture, Modern Furniture
Materials: IKEA TIDIG light, Binder Rings, Keychain Rings, 3-4 Candle Holders from Hobby Lobby or any other Crystal hangings that you can find – I also used Crystal Christmas tree ornaments shaped like hearts, Hooks (to attach the power cord to the wall if you did not have a separate light to hook the TIDIG up to)
Description:
Cost: Around $200 – sounds pricey but it really isn’t when you consider that the same could be found for $799 at Lamps Plus. Then I found this on your blog.
I wanted to make it but unfortunately Ikea doesn’t sell the GLIMT anymore; at least in my area here in AZ. So I went to Ikea and found the 6-light TIDIG hanging ceiling light that comes with 6 frosted white lamp shades on each of the mini lights. This one looks much lengthier than the GLIMT from what I can tell in the picture, and it was the same price! The one I got isn’t on their website, but I got
it in the store and they had 2 different sizes if you’d prefer the smaller version instead like the GLIMT.
To get the crystal Chandelier hangings, I actually went to Hobby Lobby and bought candle holders (They were 23.99 each, but I got them for 50% off because they are almost always having a sale on candle holders).
I removed all the crystal hangings from the candle holder. Then I regifted the candle holders without the crystals to different people for Christmas – it looks very modern without the crystals and people were telling me how cute they looked (not knowing they were missing the crystals).
Then I had my dad install the light into our loft window opening. He also attached a power cord because unless you have another light that you removed to hook this up to, you will need to attach it to a power cord. He then used 2 hooks and attached them in the corners of the windows to keep the white cord from hanging in the way.
Once it was hung up, my friend and I attached the rhinestone hangings using keychain and binder rings .
.
December 26th, 2010 — Furniture, Modern Furniture
Materials: Hemnes
Description: Just recently I painted the eight drawer Hemnes dresser for my boys room, check it out here.
~ Kate


December 26th, 2010 — Furniture, Modern Furniture
Materials: TROLLSTA
Description: Djinny tips me on this hack. (thanks!)
An Ikea shelf (not sure of its name) shod with Trollsta legs for a pretty shoe rack.
See more of the shoe rack.


December 26th, 2010 — Furniture, Modern Furniture
Materials: Jokkmokk
Description: We took my old Jokkmook table and used it as the vanity in our new bathroom. The table was about 6 years old. We sold off the old chair and cut the table so it would fit in the angled corner. The sink is from Overstock.com.
Here’s a link to the installation.
~ Catherine


December 26th, 2010 — Furniture, Modern Furniture
Materials: Pax
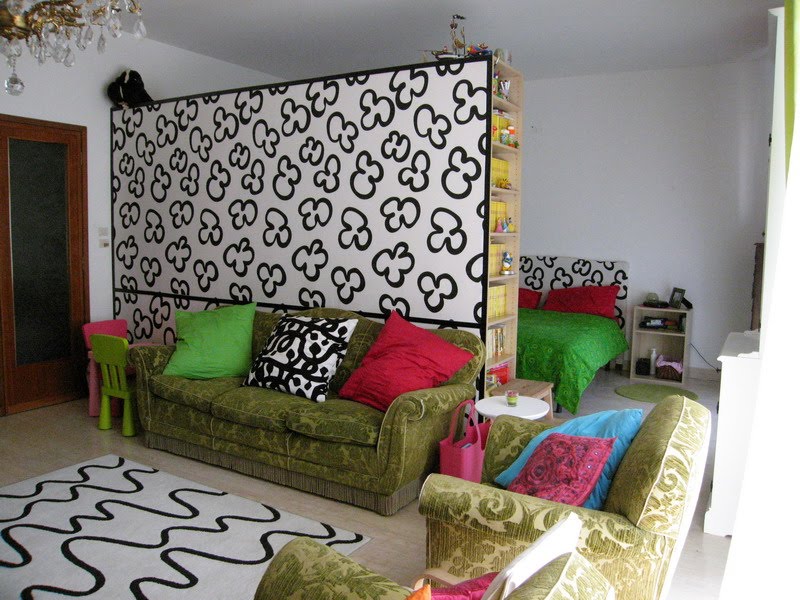
Description: I’m glad to show you my ikea hack! Mine it’s a 42sqm room that I had to divide into a day and night zone without building any wall!
I decided to buy a huge Pax wardrobe and put it in the center of my room! I assembled a Pax component with a 90degrees rotation and left it without door: now it’s my bookshelf!
Then I bought an Ikea cloth to cover the wardrobe back and my old grandparents wooden bedhead.
~ Elisa, Rome, Italy.


December 26th, 2010 — Furniture, Modern Furniture
Materials: Antilop
Description: From table with legs to bath without, Antilop is a winner!!
~ Teresa


December 26th, 2010 — Furniture, Modern Furniture
Materials: Bjarnum
Description: Coffee table with Bjarnum shelf brackets for legs.
~ Clay Nunnally


December 26th, 2010 — Furniture, Modern Furniture
Materials: One leg from a Lack side table
Description:
It’s a lamp with a textile electrical cord, hand built from the leg of a LACK side-table.
See more of the textile electrical cord lamp.
~ Charles Crawford, http://crawfordcreativestudio.com


December 26th, 2010 — Furniture, Modern Furniture
December 26th, 2010 — Furniture, Modern Furniture
- Buy a HULTET bamboo dish 45cm.
- Cover it with golden acrylic paint, front and back.
- Look for a picture or a drawing of a hibiscus flower you like put it in the size you like and print it out, then cut it out trace it on the dish.
- Look for tendrils samples you like, or draw the lines freehand on the dish.
- Fill in the black background with acrylic paint.
- For the tendrils, you need 3D glue for foils (it dries up transparently, but it remains sticky).
- Cover the tendrils completely let it dry!!
- Apply the décor foil irregular (I’ve used a little red and bronze at the edge and covered the rest with gold). Important: the metallic or coloured side has to be above! Press on well and peel it off, repeat this step as often as necessary.