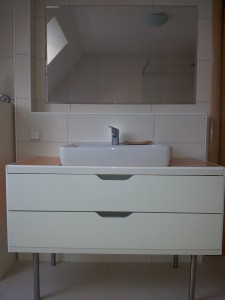
Materials: Stolmen chest of two drawers, steel furniture feet, screws, tape, all purpose glue, flagging, joint compound, flagging corners, silicone; Tools: jig saw Description: Inspired from the “bathroom special: space saving wall mounted vanity” I did my own Stolmen vanity unit. First I cut out the contour of the drain and the water valves on the backside of the Stolmen chest with the jig saw. 2. Mount the chest on the furniture feet – these are available in your building center in different forms and heights
Go here to read the rest:
My Stolmen vanity unit
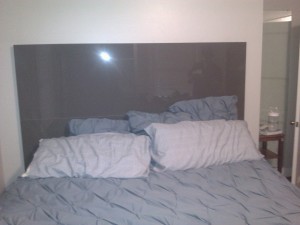
Materials: Perfekt Abstrakt High gloss grey panels, wood framing Description: I made this headboard from Ikea’s high gloss kitchen panels. The panels come in 24×80″ so I used 2 horizontally with one above the other so as to not have to cut and re-edgeband them. I ripped four 1″ thick and 30″ long vertical strips from 2×4’s to connect the 2 panels together and spaced them evenly along the back. I then ripped longways two 2×4’s with my table saw blade on a 30 degree angle and trimmed them to 60″ long. I mounted one half of each 2×4 to the wall and the other half on the top and bottom backside of the headboard
Original post:
Ikea Floating Headboard from Kitchen cover panels
Materials: STENSTORP kitchen island NOK 3.250,-, 4 wheels ca. NOK 1200,-, drill, hammer
Description: A couple of years ago I bought a STENSTORP kitchen island. Because we have little space, I wanted to have put wheels on it for more flexibility. We did the makeover this winter and it works so well!
My sister is a handy woman and did most of the work. I took pictures, and chopped of the legs, actually sawed them!
The item has shelves on one side (now called backside). On the reverse side there is an open space so you can use it as a bar, with stools (now called front side). The two parts are divided by a wall, which serves as the back of the shelves.
First we took the top of the kitchen island.
Then we sawed of the horizontal planks that are holding the front side legs. Then we shortened all legs.
We took the legs from the front side and fasten it to the vertical plank that is holding the wall.
Then we took horizontal planks and fasten it under the legs, and fasten the wheels in them.
In the end we put the top back on!!!
Voila! And good luck!
~ hildeovedia, Oslo, Norway


