October 1st, 2012 — Furniture, Uncategorized
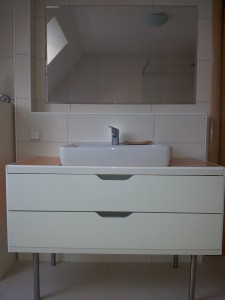
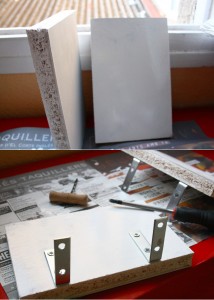
Materials: Stolmen chest of two drawers, steel furniture feet, screws, tape, all purpose glue, flagging, joint compound, flagging corners, silicone; Tools: jig saw Description: Inspired from the “bathroom special: space saving wall mounted vanity” I did my own Stolmen vanity unit. First I cut out the contour of the drain and the water valves on the backside of the Stolmen chest with the jig saw. 2. Mount the chest on the furniture feet – these are available in your building center in different forms and heights
Go here to read the rest:
My Stolmen vanity unit
September 20th, 2012 — Furniture, Uncategorized
Materials: Any furniture Expedit series, two or three little selves, polyethylene foam (or manila rope), two scratching boards Description: The aim is to create a space in which the cat can climb to the top of the main shelf, finding footholds in their path, they can also serve to drop to the floor when he wants. The shelves must be small, cannot occupy the entire width of the Expedit. You can cut a shelf EKBI Laiva, although I reuse a piece of Pax wardrobe by cutting the right size. STEP 1: We first determined the height at which we will place the shelves on the side of the Expedit. If necessary, paint the shelves to match the main furniture
See more here:
Expedit sideways cat tree
July 5th, 2012 — Design, Furniture, Uncategorized
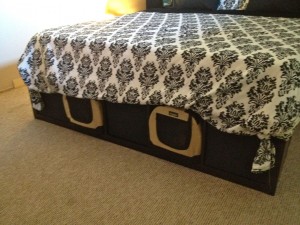
Materials: 3 Expedit Units, two sheets of plywood, five 4 x 4’s, 5 metal ties, 10 metal brackets, king-sized sheet, staple gun. Description: We had a really hard time trying to find a platform for our Cal-King mattress that would afford us the kind of storage we needed for our small two-bedroom condo in Southern California. Most of the platform storage beds for sale were prohibitively expensive. We had seen a few people make smaller beds on this site using the Expedit bookshelves, so we decided to give it a go ourselves. Step One: Spend several weeks researching and arguing about how to design your bed
Read more from the original source:
Finally, a Cal-King Bed Frame with space for dog kennels
February 4th, 2012 — Furniture, Uncategorized
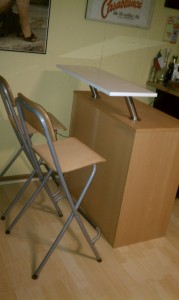
Materials: Effectiv, Abstrakt, Capita Description: In this hack, I take an EFFECTIV Add-on (high), original price $80, purchased in the As-Is department for $45, a set of CAPITA angled brackets ($14.99), ABSTRAKT kitchen door piece, regular $74, also purchased in the As-Is department for $1.99. The first thing I had to do was take some isopropyl alcohol and remove the “As-Is” and item number written on the back side of the cabinet (which will be the front part of the bar). The As-Is department apparently now requires that the words AS-IS and the item # be marked in a prominent place on the furniture, which I find ridiculous, because it potentially ruins the piece.
Follow this link:
Cheap, (Almost) Instant bar!
September 22nd, 2011 — Furniture, Uncategorized

Materials: Antonius shelf, Ekby Stödis brackets, Hessum doormat, screws, metallic L-brackets, white paint, pole, jute rope, floor protectors, small nails Description: Since I think most cat-clawing furniture are both really expensive and ugly I decided to make my own. 1.Take the Antonius shelf and cut it in three or how many “floors” you want for your cat. I measured two shelves after about half of the doormat and let the last piece become the bottom plate
Read the rest here:
Kitty cat’s Clawpole
May 21st, 2011 — Article, Design, Furniture, Uncategorized
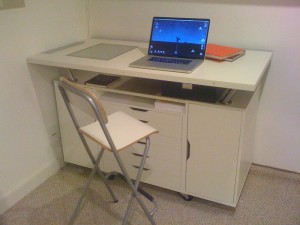
Materials: 2 VIKA ALEX storage units ($50 each): 601.928.26; 1 ALEX flatfile drawer unit ($120): 401.962.41; 1 tabletop (I used VIKA BLECKET because of the sweet lightbox inlay – $100): 201.036.05; 2 sets CAPITA brackets ($15 each, $30 total): 400.511.96; 1 RATIONELL shelf (30×24, set of 2 for $16): 245.785.10 Description: We finished a basement renovation recently that yielded a small room that I could use for a design/music studio. The room is small (about 10'x10' with a 3' swath of space under stairs) and making the best possible use of the space is key – as is finding furniture that's a little undersized to keep from making the room feel cramped. A goal was also to give my girls a space where they could do art projects and leave them out to dry, or just have the freedom to leave the space a little messier than they could leave the dining room or kitchen counter. Source: Readmade Magazine, Bauhaus Beauty I saw an article in a recent issue of ReadyMade (pic, right) about a furniture designer who found a killer Bauhaus-designed house in the hills of St
See the article here:
ALEX work table with flat files
December 26th, 2010 — Furniture, Modern Furniture
Materials: Bjarnum
Description: Coffee table with Bjarnum shelf brackets for legs.
~ Clay Nunnally


July 11th, 2010 — Furniture, Modern Furniture
Materials: 1x BILLY bookcase, 1x VIKKA AMON table top, 2x VIKKA BYSKE table legs legs
Description: After moving into a small flat, my wife had the brilliant idea of combining our bookcase with a bar-type dining table. We searched high and low on the net for similar ideas but the closest thing we found was the expedit desk (ugly and too small for us).
Much to our relief her inspiration paid off and we are now very happy with our new dining table/bookcase combo.
Here’s what we did:
1. fastened the billy to the wall to ensure it’s stable.
2. attatch vikka byske legs to vikka amon table top (holes already drilled).
3. place free end of table on the fixed shelf of the billy (approx 105cm high). All we did to fasten the table top was put some velcro tape between it and the shelf – works perfectly but a more secure method could be found (some little L brackets maybe).
Too easy! We finished off by buying 4 tall franklin stools and a benno to put our dvds in.
~ Rocky & Yvette, Perth Australia


July 11th, 2010 — Furniture, Modern Furniture
Materials: Ikea Malm Bedframe, plywood, batting, fabric, staple gun, L brackets, screws
Description: I owned the Ikea Malm bedframe and wanted to add height to my headboard. With a quick trip to a local hardware and fabric store, I came home with plywood, L- brackets, screws, a staple gun, batting, and fabric. In a couple hours I completely transformed my bed from blah to BAM!
before
I first added 18″ in height to the headboard by attaching a piece of plywood that matched the width of the Ikea frame. I did this with (3) L-brackets each requiring (2) screws and a scrap piece of plywood using (8) screws.
I next wrapped the plywood and then the entire “new” headboard in a couple sheets of batting stapling it across the back on the sides and top.
The last step was wrapping my heightened headboard in the linen fabric I chose stapling it again on the back across the top and sides.
It really was a piece of cake and I love the visual impact my headboard now has in the room!
~ Meghan Posner


June 1st, 2010 — Furniture, Uncategorized
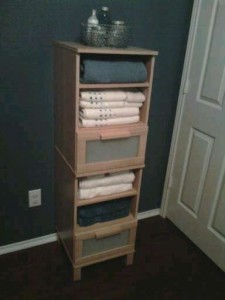
Materials: 2 Aneboda nightstands Description: After moving a pair of Billy bookcases into our Aneboda-stocked guest room, we realized the nightstands suddenly had no home. There wasn’t enough floorspace to keep them both around, given that we already have a narrow 5-drawer and standard sized 3-drawer dresser in there. To maintain storage space, but use less floorspace, I simply stacked the leftover nightstands, with a minor modification. I removed the top board on the lower nightstand, and removed the feet from the upper nightstand. With a few holes drilled, I was able to fit them together with the existing twist-in metal rods and wooden dowels
See more here:
Stacked nightstands


