April 7th, 2012 — Design
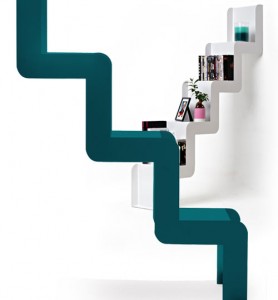
The Juliette wall shelf, designed by Jean-Marc Gady , is made from lacquered bent steel and can work in just about any room. The staircase-like design is not just a unique way to display your books and knick-knacks, it can also work as a room divider. Juliette is available in five colors and is sold through HartoDesign . Photos by Jérémie Woillard. Share This: Twitter | Facebook | Discover more great design by following Design Milk on Twitter and Facebook
Read the original here:
Juliette Wall Shelf Jean-Marc Gady
September 10th, 2011 — Design

Ildikó Valicsek is a student studying textile design who has recently completed a room divider called Roll using pieces of PVC that interconnect. There are tons of different ways to create a room divider using the Roll textile pieces. Share This: Twitter | Facebook | Discover more great design by following Design Milk on Twitter and Facebook . © 2011 Design Milk | Posted by Jaime in Home Furnishings | Permalink | No comments
Read more:
Roll Room Divider by Ildikó Valicsek
March 23rd, 2011 — Design

Loook Industries has created two new seating pieces, the Box Sofa and Lounger, which launched back in February at the Stockholm Furniture Fair . The Box Sofa and Lounger Designed by Ivar Gestranius and Kevin Lahtinen, the Box Sofa and Lounger provide a quiet and visually secluded cover from the surrounding noise and movement. Perfect for open-space offices and public spaces, or used as a room divider.
Read this article:
Think Inside The Box
December 26th, 2010 — Furniture, Modern Furniture
Materials: Pax and Bergsbo
Description: Objectives : designing and planning our attic room with storage (many for Mrs !) and a little office zone.
Initial situation : 25 sq metres without any divider and without any storage
IKEA Materials :
-2 Pax wardrobes in 100 x 240 cm
-1 pax Add-on corner unit (240 cm)
-3 Pax wardrobes in 50 x 192 cm
-5 Bergsbo doors
-1 mirror door
Other materials
-A door
-milled panels
-insulation plates (wool and hemp)
-many battens
Steps
1. Assembling and fixing against the wall the 2 huge Pax wardrobes and the Pax Add-on corner without forgetting technical shaft (phone, electricity and ethernet)
2. Fixing battens on the back of pax wardrobes vertically and up to the ceiling
3. Fixing the door with battens
4. Mounting the wall with milled panels without forgetting to put insulation plates between battens
5. Finishing the wall with milled panels
6. Reshaping of the 3 192 cm pax wardrobes to fit under the roof and fixing against the wall
7. Reshaping Bergsbo doors and fixing
Here we are ….. many many storage and a really nice and insulated divider !
~ Madotter, Paris region


