Seabank Cottage by Manalo & White
July 12th, 2010 — Furniture, Modern Furniture
LOW3 Solar Powered House
July 12th, 2010 — Furniture, Modern Furniture
Candle dish birdbath
July 11th, 2010 — Furniture, Modern Furniture

Materials: Ikea Bigarra Candle Dish, 3, 4′ wood dowels
Description: I bought the Bigarra Candle Dish to use as a – GASP – candle dish.
A few days later I began thinking about making a birdbath from scratch because most of them are either too expensive or too ugly. Oftentimes, they are both.
Realized the candle dish was the perfect shape and size for the sleek/organic look that I wanted. Ta Da!


Just hammer the dowels at least 12″ into the ground. Use a level to make sure they’re even and place the dish on top.

Full instructions on staining dowels etc.
~ Karen Bertelsen, Ontario, Canada
Stolmen bike rack the return
July 11th, 2010 — Furniture, Modern Furniture

Materials: To hang 2 bikes: for the ’stand’: 1 Stolmen post, 2 Stolmen end fittings, 4 Stolmen hooks, square metal tubing, bike inner tube, nuts and bolts, screws. for the ’stabiliser’: 2 Dignitet curtain wire packs (i.e. 4 end fixings), Stolmen bracket, steel with a 90° twist, nuts and bolts, saw
Description: This is an adaptation of a hack posted in 2008, which my husband found whilst searching for a sleek storage solution for our 2 mountain bikes. We liked the idea of using the Stolmen post to make use of our incredibly high ceilings and an awkward shaped niche in our office (that wouldn’t fit a standard wall mounted bike stand). We also hacked the Stolmen post to hang our bedroom curtains and wanted to see how many uses we could put it to in our home!! However, as we have a suspended ceiling, we couldn’t fully utilise the expanding feature of the post to secure the stand in place, so we had to hack another Ikea product to create a stabiliser.
We followed Michael’s hack from 2008 for the main bike stand, except that we used inner tube to cover the hooks for a more durable finish: picture bike hanger. We also screwed the post into the floor for extra stability.

To make the stabiliser, we (i say ‘we’; i mainly just watched and documented progress with my camera!!) cut the twisted steel to size and then clamped it to the Stolmen post with a standard issue Stolmen bracket and a bolt. After some battling with the wall studs, we placed Dignitet end fixings on the walls behind and in front of the post to prevent the post being pulled forward by the weight of the bikes and also to provide some support in case of inadvertent clumsiness on my part.

We then connected the curtain wires over the steel and clamped them in place with another piece of the cut steel and more bolts, like so:


It took longer than Michael’s half an hour, but we think the result is pretty funky.
~ Shel, London
Cabinet to hide the boiler and fuse box
July 11th, 2010 — Furniture, Modern Furniture

Materials: Pax Wardrobe
Description: I had an ugly, 1970’s cabinet that hid our boiler and our fusebox. I wanted the cabinet to match the kitchen just a few feet away.

The challenge was that there’s lots of pipes and electrical wires that can’t be moved.
I purchased one 100cm wide and two 50cm wide Pax wardrobe cabinets with doors that matched my ikea kitchen.
The 100cm wide cabinet was used to hide the boiler. I used only the two side panels, the bottom toe kick and the doors. The board meant to go at the top of the cabinet was cut into several pieces that allowed the pipe, but still provided the needed stability. Holes were cut into the sides to allow pipes and wires.


One of the 50cm cabinets was used to hide some pipes and a fusebox. The cabinet was assembled according to the instructions with only half of the back and holes cut into the side to accommodate a large pipe.
The third cabinet was assembled with no hack. It’s nice to have some extra storage.
I love the final product. I was pleasantly surprised to find the chipboard tolerated cutting and drilling with no problems at all.
~ Jules, Vancouver bc
Stool in the Japanese style
July 11th, 2010 — Furniture, Modern Furniture

Materials: IKEA’s stool, acrylic paint, silver ink
Description:
1. buy stool
2. paint it by black acrylic paint
3. process sandpaper on the edges stools
4. paint the picture by the silver ink
5. covered with polyurethane varnish


that’s all!!!
~ Ataka, Russia
Cat food, litter and nap Cabinet
July 11th, 2010 — Furniture, Modern Furniture

Materials: Jonas Secretary
Description: I wanted a cat cabinet to hold both the cat food and cat litter. I wanted the cat litter to be high enough so I wouldn’t have to bend over to clean it. I also wanted the cabinet to serve as a dark hiding space for my cats (they like to get away from the dogs every now and then). After being inspired by many of the Ikea hacks on this site, I took a trip to Ikea and found the Jonas Secretary.
I put the cabinet together using the Ikea directions and then proceeded to hack the product in the following way:
1. I decided the top “computer station” was the perfect place to put the litter, as I could easily slide it out onto the pull down door. I cut a hole on the bottom right hand side using an electric jigsaw. The original hole was not big enough for my fat cat ![]() so I ended up cutting almost 1/3 of the shelf away. This allows my cats to drop from the top section of the cabinet into the top drawer.
so I ended up cutting almost 1/3 of the shelf away. This allows my cats to drop from the top section of the cabinet into the top drawer.

2. I made an identical cut on the bottom left hand side of the top drawer, creating an opening into the middle drawer.

3. I cut an entry hole (about 5×7 inches) level with the second drawer. I nailed a picture frame I found for $3 at Target to the opening. Now the cats are able to climb into the second food drawer, up to the third napping drawer and then into the litter cabinet at the top.

4. Considering how heavy my cats are, I reinforced the two middle drawers by screwing two pieces of plywood (1/2 x 2 x 16 and 13/16 inches each) under each drawer to help support the bottom.
5. I used clear adhesive shelf liner in the litter cabinet area (along with some sealant) to help with cleanup.
6. Originally, I was just going to place the food dishes in the second shelf, but the space ended up being smaller than I thought. My current food dishes are metal with circular lips. I decided to cut circles out of the bottom of the second drawer to hold each dish.

7. I never liked the handles that came with the cabinet, so I just never put them on. I also thought the cabinet was too dark, so I affixed a mirror I bought at Ikea to the front door. This process was a little more intense than I originally thought, since the door is actually hollow. I cut the mirror to size, then GLUED and screwed the holders into place.
Overall, I’m really pleased with the outcome. Now I just hope my cats like it as well!
~ Teresa, Austin, TX
VASTLIG Topsy-Turvy style planter for $2
July 11th, 2010 — Furniture, Modern Furniture

Materials: VASTLIG
Description: This works best with younger plants, though I have transplanted full size plants into this upside-down configuration without too much problem.
Tools: Scissors, plant, dirt, boxboard or cereal box-type material-(you can use felt too.) A pole for hanging your plant.
1. Look at your plant and decide if you want to push the roots up through the bottom or if you want to push the plant down through the bottom.
2. Get you VASTLIG bag and cut a X on the bottom. It should be as wide as the branching leaves on your plant or the root ball. You don’t want to make this too big or the plant will fall out. But you can make your X smaller in the next step.
3. Cut the boxboard or felt to fit the bottom of the bag- it doesn’t have to fit exactly, but it must be a few inches bigger than the X. This is a collar.
4. Cut collar from the edge of the boxboard or felt to the center, and when you get to the center, cut a circle shape. Set this aside.
5. Now put your plant through, then grab your collar and nestle it down into the bag so it holds the roots and keeps them from falling out of the X.

6. Add dirt and water and you are done.
P.S. Ikea for City Gardening!
By looking at Ikea items in a different perspective, I have used them for my city garden.


~ Ninjarita, Minneapolis
XL Numerar Desk
July 11th, 2010 — Furniture, Modern Furniture
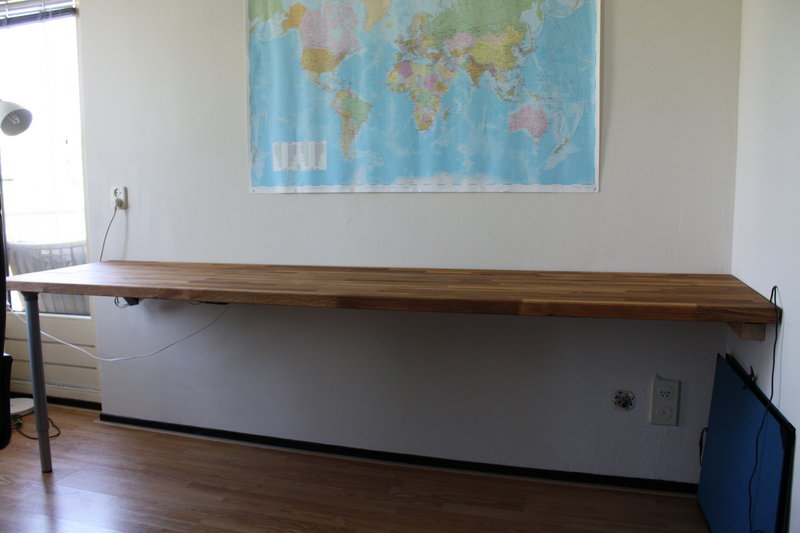
Materials: Numerar Worktop (246 x 62cm) / Vika Kaj Adjustable Leg
Description: Me and my girlfriend needed a new desk. A large one. So that we could work at it together. Inspired by this post, we decided to go for a Numerar worktop (length 246cm). We thought it would look best to use as few legs as possible so we mounted some wooden beams we had left to our wall for the worktop to lay on. On the one side where there is no wall we attached a Vika Kaj adjustable leg to the worktop. The result is surprisingly stable!


For some unknown reason our walls are not 100% straight. This allows for some neat cable management as can be seen on the pictures.
Hope you like it.
~ Oscar, The Netherlands
Ãnga cabinet sideboard
July 11th, 2010 — Furniture, Modern Furniture

Materials: Ãnga two compartment cabinet, Capita legs, Rubrik cabinet door
Description: My roommate and I were looking for something to use as a sideboard in a space in our dining room, and obviously wanted to go the Ikea route to flow with the rest of our apartment, but were having some troubles. We wanted something that would provide lots of storage but wouldn’t be too big depth-wise.
While perusing the As-Is section, we happened upon two identical, brand new condition Ãnga pieces. They were already assembled, but we determined they were brand new because they still had the protective film on the surfaces. Originally these cabinets are $120 each, but we found them for $40 each.
Since our apartment building is an older building, we didn’t think that the walls would be capable of supporting the rails necessary for the actual Ãnga system, so we opted to make a free-standing unit, and bought a set of the 8″ Capita legs… seemingly the simplest go-to pieces for hacking something that you want elevated a bit.
We weren’t really interested in the standard look of 4 straight doors, which would look like a dresser so we purchased a set of the 4″ Capita legs in the As-Is department for a couple of dollars as well. I had a grey-blue Rubrik cabinet door from an old hack I did, which fit perfectly on top of one of the cabinets, upon which we put the other cabinet. Having the Rubrik door in between the two pieces gives it a little differentiation, a subtle addition of colour and with the metal edge, ends up tying them together as well.

Even though this is just a simple “add Capita legs to something” hack, we took pieces that are meant to be mounted in a different fashion, and used them for a different purpose as a dining room sideboard cabinet, rather than an entertainment centre on the rails they were intended for.

~ Steve L., Providence, RI