July 11th, 2010 — Furniture, Modern Furniture
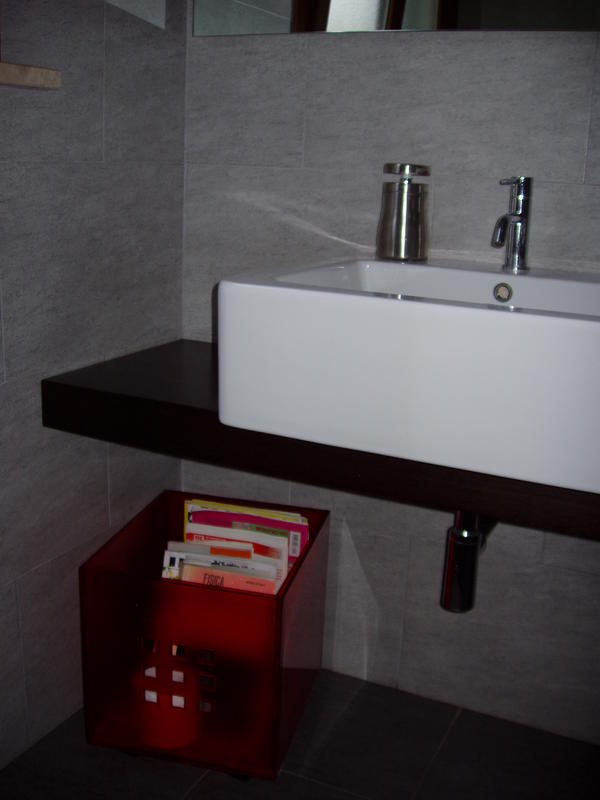
Materials: Lekman box, wood sticks, 4 wheels
Description: I needed a magazine rack in the bathroom so we buy a Lekman box and my husband added to the container a frame with wheels. The frame is not connected to the container but we have had not capsizing or slide.
~ Luxra, Italy


July 11th, 2010 — Furniture, Modern Furniture
Materials: To hang 2 bikes: for the ’stand’: 1 Stolmen post, 2 Stolmen end fittings, 4 Stolmen hooks, square metal tubing, bike inner tube, nuts and bolts, screws. for the ’stabiliser’: 2 Dignitet curtain wire packs (i.e. 4 end fixings), Stolmen bracket, steel with a 90° twist, nuts and bolts, saw
Description: This is an adaptation of a hack posted in 2008, which my husband found whilst searching for a sleek storage solution for our 2 mountain bikes. We liked the idea of using the Stolmen post to make use of our incredibly high ceilings and an awkward shaped niche in our office (that wouldn’t fit a standard wall mounted bike stand). We also hacked the Stolmen post to hang our bedroom curtains and wanted to see how many uses we could put it to in our home!! However, as we have a suspended ceiling, we couldn’t fully utilise the expanding feature of the post to secure the stand in place, so we had to hack another Ikea product to create a stabiliser.
We followed Michael’s hack from 2008 for the main bike stand, except that we used inner tube to cover the hooks for a more durable finish: picture bike hanger. We also screwed the post into the floor for extra stability.
To make the stabiliser, we (i say ‘we’; i mainly just watched and documented progress with my camera!!) cut the twisted steel to size and then clamped it to the Stolmen post with a standard issue Stolmen bracket and a bolt. After some battling with the wall studs, we placed Dignitet end fixings on the walls behind and in front of the post to prevent the post being pulled forward by the weight of the bikes and also to provide some support in case of inadvertent clumsiness on my part.
We then connected the curtain wires over the steel and clamped them in place with another piece of the cut steel and more bolts, like so:
It took longer than Michael’s half an hour, but we think the result is pretty funky.
~ Shel, London


July 11th, 2010 — Furniture, Modern Furniture
Materials: 1x BILLY bookcase, 1x VIKKA AMON table top, 2x VIKKA BYSKE table legs legs
Description: After moving into a small flat, my wife had the brilliant idea of combining our bookcase with a bar-type dining table. We searched high and low on the net for similar ideas but the closest thing we found was the expedit desk (ugly and too small for us).
Much to our relief her inspiration paid off and we are now very happy with our new dining table/bookcase combo.
Here’s what we did:
1. fastened the billy to the wall to ensure it’s stable.
2. attatch vikka byske legs to vikka amon table top (holes already drilled).
3. place free end of table on the fixed shelf of the billy (approx 105cm high). All we did to fasten the table top was put some velcro tape between it and the shelf – works perfectly but a more secure method could be found (some little L brackets maybe).
Too easy! We finished off by buying 4 tall franklin stools and a benno to put our dvds in.
~ Rocky & Yvette, Perth Australia


July 11th, 2010 — Furniture, Modern Furniture
Materials: 1 Stolmen post, 2 Stolmen end fittings, assorted bangles, split rings (keyrings), eyelet screws, curtain hooks, screws
Description: Despite scouring the shops and internet, I couldn’t find a curtain pole to fit snugly into the niche of our large window without needing cumbersome and ugly central fittings. The extendable Stolmen post offered the perfect solution.
As the Stolmen post has a diameter larger than most curtain rings, my husband came up with the idea of using bangles instead. We made these into curtain rings with an assortment of eyelet screws (for the larger ones) and split rings (for the smaller ones).
July 11th, 2010 — Furniture, Modern Furniture
Materials: Pax Wardrobe
Description: I had an ugly, 1970’s cabinet that hid our boiler and our fusebox. I wanted the cabinet to match the kitchen just a few feet away.
before
The challenge was that there’s lots of pipes and electrical wires that can’t be moved.
I purchased one 100cm wide and two 50cm wide Pax wardrobe cabinets with doors that matched my ikea kitchen.
The 100cm wide cabinet was used to hide the boiler. I used only the two side panels, the bottom toe kick and the doors. The board meant to go at the top of the cabinet was cut into several pieces that allowed the pipe, but still provided the needed stability. Holes were cut into the sides to allow pipes and wires.
One of the 50cm cabinets was used to hide some pipes and a fusebox. The cabinet was assembled according to the instructions with only half of the back and holes cut into the side to accommodate a large pipe.
The third cabinet was assembled with no hack. It’s nice to have some extra storage.
I love the final product. I was pleasantly surprised to find the chipboard tolerated cutting and drilling with no problems at all.
~ Jules, Vancouver bc


July 11th, 2010 — Furniture, Modern Furniture
Materials: Ikea Malm Bedframe, plywood, batting, fabric, staple gun, L brackets, screws
Description: I owned the Ikea Malm bedframe and wanted to add height to my headboard. With a quick trip to a local hardware and fabric store, I came home with plywood, L- brackets, screws, a staple gun, batting, and fabric. In a couple hours I completely transformed my bed from blah to BAM!
before
I first added 18″ in height to the headboard by attaching a piece of plywood that matched the width of the Ikea frame. I did this with (3) L-brackets each requiring (2) screws and a scrap piece of plywood using (8) screws.
I next wrapped the plywood and then the entire “new” headboard in a couple sheets of batting stapling it across the back on the sides and top.
The last step was wrapping my heightened headboard in the linen fabric I chose stapling it again on the back across the top and sides.
It really was a piece of cake and I love the visual impact my headboard now has in the room!
~ Meghan Posner


July 11th, 2010 — Furniture, Modern Furniture
Materials: Ikea Bomull bedspread
Description: I needed FIVE panels (big and small) of roman blinds for my bedroom, and those upscale textured and nice upholstery fabrics are out of my current budget set for window dressing…so I remembered my favourite unbleached cotton from Ikea….the BOMULL bedspread! With the perfect width and length, these fit into my budget perfectly.
After one whole day of sewing, it’s my 1st attempt at roman blinds by the way, thus I am not familiar with it..much…..
I have 3 small windows and 1 extra wide extra large window dressed in zen….
I even had some extrasss….not much, but enough to make a twirly skirt for my 4.5 year old 
See more of Joey’s Bomull roman blinds.
~ Joey, Malaysia


July 11th, 2010 — Furniture, Modern Furniture
Materials: IKEA’s stool, acrylic paint, silver ink
Description:
1. buy stool
2. paint it by black acrylic paint
3. process sandpaper on the edges stools
4. paint the picture by the silver ink
5. covered with polyurethane varnish
that’s all!!!
~ Ataka, Russia


July 11th, 2010 — Furniture, Modern Furniture
Materials: Jonas Secretary
Description: I wanted a cat cabinet to hold both the cat food and cat litter. I wanted the cat litter to be high enough so I wouldn’t have to bend over to clean it. I also wanted the cabinet to serve as a dark hiding space for my cats (they like to get away from the dogs every now and then). After being inspired by many of the Ikea hacks on this site, I took a trip to Ikea and found the Jonas Secretary.
I put the cabinet together using the Ikea directions and then proceeded to hack the product in the following way:
1. I decided the top “computer station” was the perfect place to put the litter, as I could easily slide it out onto the pull down door. I cut a hole on the bottom right hand side using an electric jigsaw. The original hole was not big enough for my fat cat  so I ended up cutting almost 1/3 of the shelf away. This allows my cats to drop from the top section of the cabinet into the top drawer.
2. I made an identical cut on the bottom left hand side of the top drawer, creating an opening into the middle drawer.
3. I cut an entry hole (about 5×7 inches) level with the second drawer. I nailed a picture frame I found for $3 at Target to the opening. Now the cats are able to climb into the second food drawer, up to the third napping drawer and then into the litter cabinet at the top.
4. Considering how heavy my cats are, I reinforced the two middle drawers by screwing two pieces of plywood (1/2 x 2 x 16 and 13/16 inches each) under each drawer to help support the bottom.
5. I used clear adhesive shelf liner in the litter cabinet area (along with some sealant) to help with cleanup.
6. Originally, I was just going to place the food dishes in the second shelf, but the space ended up being smaller than I thought. My current food dishes are metal with circular lips. I decided to cut circles out of the bottom of the second drawer to hold each dish.
7. I never liked the handles that came with the cabinet, so I just never put them on. I also thought the cabinet was too dark, so I affixed a mirror I bought at Ikea to the front door. This process was a little more intense than I originally thought, since the door is actually hollow. I cut the mirror to size, then GLUED and screwed the holders into place.
Overall, I’m really pleased with the outcome. Now I just hope my cats like it as well!
~ Teresa, Austin, TX


July 11th, 2010 — Furniture, Modern Furniture
Materials: VASTLIG
Description: This works best with younger plants, though I have transplanted full size plants into this upside-down configuration without too much problem.
Tools: Scissors, plant, dirt, boxboard or cereal box-type material-(you can use felt too.) A pole for hanging your plant.
1. Look at your plant and decide if you want to push the roots up through the bottom or if you want to push the plant down through the bottom.
2. Get you VASTLIG bag and cut a X on the bottom. It should be as wide as the branching leaves on your plant or the root ball. You don’t want to make this too big or the plant will fall out. But you can make your X smaller in the next step.
3. Cut the boxboard or felt to fit the bottom of the bag- it doesn’t have to fit exactly, but it must be a few inches bigger than the X. This is a collar.
4. Cut collar from the edge of the boxboard or felt to the center, and when you get to the center, cut a circle shape. Set this aside.
5. Now put your plant through, then grab your collar and nestle it down into the bag so it holds the roots and keeps them from falling out of the X.
6. Add dirt and water and you are done.
P.S. Ikea for City Gardening!
By looking at Ikea items in a different perspective, I have used them for my city garden.
VASTLIG- bag as upside-down planter
FNISS-waste basket as deep root planter
EVERT- as deep root planter
SMYCKA- tied together as plant supports
TROFAST- as shallow root planter
~ Ninjarita, Minneapolis