January 9th, 2012 — Furniture, Uncategorized
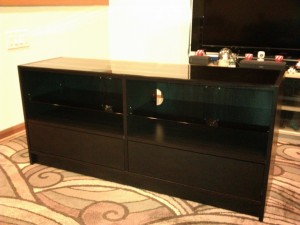
Materials: Boksel sofa table, USB-powered case fans, electric drill and large bits, furniture stain, screws and bolts, furniture feet Description: For a long time I've wanted to replace my old IKEA media center cabinet. Multiple times I've lingered in the Besta section but just couldn't imagine a solution that I liked. Last weekend we found the Boksel sofa table in the as-is section, which met almost all of my desires, but needed a few adjustments.
Go here to read the rest:
Boksel Media Box
October 26th, 2011 — Furniture, Uncategorized
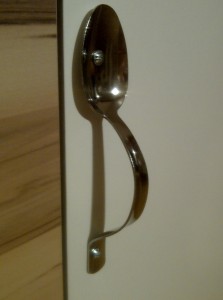
Materials : Cutlery (BONUS) just the spoons, screws Description : As I have already said before: the cheap and cheap-looking cutlery BONUS attracted me to define it again. With two sets of cutlery (24 pieces for 2.99 euro ) I made several hacks. The second hack only affects a supplement. I found the handles of the drawers of a yawner (and I admit that the drawers are no IKEA products, please forgive me), so the best husband of all, and I have selected the tablespoons, bend a bit and deal with holes provided. Since the material of the cutlery is quite thin, there was no problem with the drill
Link:
With a spoon full of creativity
September 22nd, 2011 — Furniture, Uncategorized

Materials: Antonius shelf, Ekby Stödis brackets, Hessum doormat, screws, metallic L-brackets, white paint, pole, jute rope, floor protectors, small nails Description: Since I think most cat-clawing furniture are both really expensive and ugly I decided to make my own. 1.Take the Antonius shelf and cut it in three or how many “floors” you want for your cat. I measured two shelves after about half of the doormat and let the last piece become the bottom plate
Read the rest here:
Kitty cat’s Clawpole
May 22nd, 2011 — Design
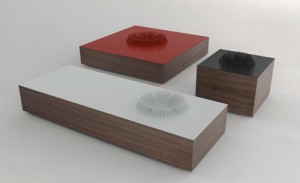
The Huddle Tables by Matthew Kroeker features Robertson machine screws meticulously arranged into three effective bowl shapes, each being permanently fixed to their base counterparts. The designer explains that “the screw, perhaps the definitive object of utility, is transformed into something elegant and impulsive; a far stretch from the original purpose of these fasteners. Now, these tightly-knit arrays of screws are given the task of holding your everyday objects, but also content being left untouched and only observed.” The prototypes are made from FSC-certified walnut veneer and formaldehyde-free plywood. The screws are made by being fastened by hand and then painted with a powder-coated finish. Share This: Twitter | Facebook | Discover more great design by following Design Milk on Twitter and Facebook
See the article here:
Huddle Tables by Matthew Kroeker
May 1st, 2011 — Design, Furniture, Uncategorized
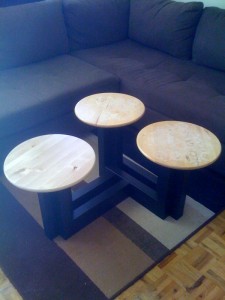
Materials: Lack Side Table Legs and Lazy Susan Table Tops Description: This creation was inspired by the 24 left over Lack Side Table legs I had after I created a headboard for my King size bed (See the post entitled “Headboard fit for a King-sized bed” for more details on that project). This table took a couple of sequential steps before finally assembling each piece to form the final table. First I designed three “+” shaped legs using five Lack Side Table legs, per leg and used double sided carpet tape to hold each “+” shape secure. For each “+” table leg, I cut out a 7″ diameter piece of MDF and attached each “+” leg to the MDF using 14 x 1″ flat head screws after pre-drilling with a countersink bit. I used metal brackets on the opposite side of the “+” legs to secure the whole leg together.
Follow this link:
Lack Lazy Susan Coffee Table
July 11th, 2010 — Furniture, Modern Furniture
Materials: 1 $1.99 Ikea wood cutting board, 8 galvanized 1 1/2″ Grabber screws, table saw, drill and countersink, drill/driver, wood putty, Workmate 400 workbench , carpenter’s wood glue
Description: I’ve been using our bread machine a lot recently, and wanted a miter box to help me cut thinner, more consistent slices. The $1.99 Ikea cutting board I’d been using for a couple of years was warping, so was fair game for cutting up to make such a device.
Using the remnant of the last loaf I had baked as a template, I took measurements and laid out cut lines on the soon-to-be-ex-cutting board. I designed it so the front panel extends down a half inch below the front lip of the countertop – the so-called bench hook effect, so the whole contraption doesn’t slip around while you are sawing your rustic loaf.
A miter box could hardly be simpler, consisting as it does of only three pieces – front, back, and bottom. This box, designed around the loaf that comes out of a Breadman bread machine, wastes only a 3/4 -inch crosswise strip from the Ikea cutting board.
I held the bottom panel vertically in the Workmate vise, and aligned the front panel horizontally on top of it, countersinking one hole at a time, then fastening them temporarily with a screw.
The reason to drill and fasten one screw at a time is because the bottom panel had a curve in it, due to the previous warping of the cutting board, and I was able to straighten it out by bending it straight with my hands until the screws could take the tension. When all the screws were fitted, I disassembled it, applied glue to the two joints, and reassembled it.
I marked vertical cut lines on the front and back panels and cut the slots with a large hand saw. In retrospect, this is not really accurate enough, and next time I’ll do this job on the table saw while the parts are disassembled. Since I’m right-handed, the cut slot is near the right side of the box.
I filled the screw holes with wood putty, waited for it to dry, and sanded the plugs flush. Then I sanded off all the various pencil marks and knocked down the fresh cut edges a little to avoid sliver hazards. Finally, I applied Ikea Skydd, food-grade mineral oil for conditioning cutting boards.
~ Mark Ungar, Richmond, CA


May 6th, 2010 — Furniture, Modern Furniture
Materials: NORREBO
Description: Maybe it’s not a real “hack”: I only put a little piece of wood on the inside of the NORREBO door and screwed two right-angle screws (how ever they are called) through. So I can display some of my old tiles there.
See more here.
~ Susanne, Germany


