July 11th, 2010 — Furniture, Modern Furniture
Materials: 1 Stolmen post, 2 Stolmen end fittings, assorted bangles, split rings (keyrings), eyelet screws, curtain hooks, screws
Description: Despite scouring the shops and internet, I couldn’t find a curtain pole to fit snugly into the niche of our large window without needing cumbersome and ugly central fittings. The extendable Stolmen post offered the perfect solution.
As the Stolmen post has a diameter larger than most curtain rings, my husband came up with the idea of using bangles instead. We made these into curtain rings with an assortment of eyelet screws (for the larger ones) and split rings (for the smaller ones).
Tags: curtain, Modern Furniture, result, suspects
July 11th, 2010 — Furniture, Modern Furniture
Materials: Pax Wardrobe
Description: I had an ugly, 1970’s cabinet that hid our boiler and our fusebox. I wanted the cabinet to match the kitchen just a few feet away.
before
The challenge was that there’s lots of pipes and electrical wires that can’t be moved.
I purchased one 100cm wide and two 50cm wide Pax wardrobe cabinets with doors that matched my ikea kitchen.
The 100cm wide cabinet was used to hide the boiler. I used only the two side panels, the bottom toe kick and the doors. The board meant to go at the top of the cabinet was cut into several pieces that allowed the pipe, but still provided the needed stability. Holes were cut into the sides to allow pipes and wires.
One of the 50cm cabinets was used to hide some pipes and a fusebox. The cabinet was assembled according to the instructions with only half of the back and holes cut into the side to accommodate a large pipe.
The third cabinet was assembled with no hack. It’s nice to have some extra storage.
I love the final product. I was pleasantly surprised to find the chipboard tolerated cutting and drilling with no problems at all.
~ Jules, Vancouver bc


Tags: cabinets, chipboard, Furniture, result
July 11th, 2010 — Furniture, Modern Furniture
Materials: MALM and Magasin
Description: Here are two of my Ikea hacks.
The first is a bed frame I made…
I recently moved from a house into a small apartment, and needed somewhere to store all of my things, but still wanted a clean, clutter-free look. Ikea had the answer. I simply found a chest of drawers that I liked from Ikea, and bought four of them – the MALM 3 drawer chest. I then built a simple bed frame to sit on top, and turned it into bed with 50 cubic feet of storage space underneath (including the drawers)!!
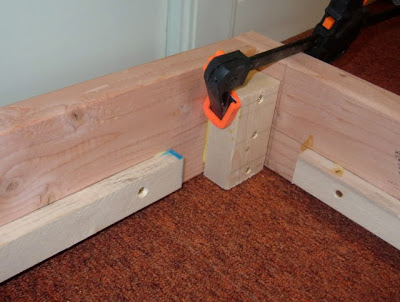
The frame wasn’t hard to build:
I measured a queen sized mattress, and cut large pieces of lumber to fit around that. Those exterior pieces of lumber were reinforced in the corners. Then I got smaller pieces of wood (2×2’s, I think) and attached them so they’d run along each inside edge of those exterior pieces. Then I placed 2×4’s on top of those runners, and they reached from one end of the frame to the other, acting as slats for the platform. Once the slats were in place, I just placed a large piece of chip board on top! I also added a couple other finishing touches, such as adding small pieces of wood to the inside edges of the chest of drawers, where I cut out a notch, which I used to hang a small curtain on a dowel to hide the spaces.
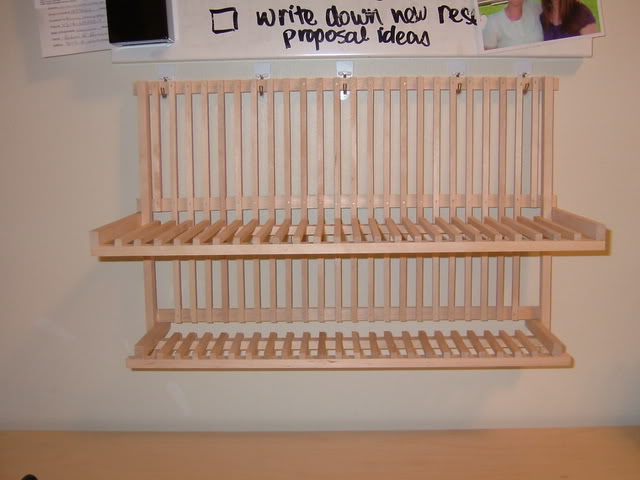
My second hack is a laptop stand…
This hack is extremely easy. I simply started with a Magasin wooden dish drainer from Ikea, and cut off the longer supporting legs on the “back” side. Then I attached it to a wall using Command 3M small wire hooks , and voila!! I used 5 of these strips because I wanted to be sure it would support the weight of my laptop. I really like the look of a floating laptop, and this dish drainer worked perfectly.
I can also remove the laptop stand from the wall completely if I wish, or fold it up completely. Or, I can fold the top portion up and use it to support a text book on the lower portion. Or finally, I place the laptop on the top portion, and either fold up the bottom portion, or use it to store my mouse, wireless keyboard, etc. Very versatile!
See more photos here.
~ Angie Andrade, Stillwater, OK


Tags: chest, drainer, finishing, mattress
July 11th, 2010 — Furniture, Modern Furniture
Materials: Ikea Malm Bedframe, plywood, batting, fabric, staple gun, L brackets, screws
Description: I owned the Ikea Malm bedframe and wanted to add height to my headboard. With a quick trip to a local hardware and fabric store, I came home with plywood, L- brackets, screws, a staple gun, batting, and fabric. In a couple hours I completely transformed my bed from blah to BAM!
before
I first added 18″ in height to the headboard by attaching a piece of plywood that matched the width of the Ikea frame. I did this with (3) L-brackets each requiring (2) screws and a scrap piece of plywood using (8) screws.
I next wrapped the plywood and then the entire “new” headboard in a couple sheets of batting stapling it across the back on the sides and top.
The last step was wrapping my heightened headboard in the linen fabric I chose stapling it again on the back across the top and sides.
It really was a piece of cake and I love the visual impact my headboard now has in the room!
~ Meghan Posner


Tags: brackets, headboard, Modern Furniture, piece, result
July 11th, 2010 — Furniture, Modern Furniture
Materials: Ikea Bomull bedspread
Description: I needed FIVE panels (big and small) of roman blinds for my bedroom, and those upscale textured and nice upholstery fabrics are out of my current budget set for window dressing…so I remembered my favourite unbleached cotton from Ikea….the BOMULL bedspread! With the perfect width and length, these fit into my budget perfectly.
After one whole day of sewing, it’s my 1st attempt at roman blinds by the way, thus I am not familiar with it..much…..
I have 3 small windows and 1 extra wide extra large window dressed in zen….
I even had some extrasss….not much, but enough to make a twirly skirt for my 4.5 year old 
See more of Joey’s Bomull roman blinds.
~ Joey, Malaysia


Tags: bedspread, budget, dressing, result, upholstery
July 11th, 2010 — Furniture, Modern Furniture
Materials: IKEA’s stool, acrylic paint, silver ink
Description:
1. buy stool
2. paint it by black acrylic paint
3. process sandpaper on the edges stools
4. paint the picture by the silver ink
5. covered with polyurethane varnish
that’s all!!!
~ Ataka, Russia


Tags: Furniture, result, russia, sandpaper
July 11th, 2010 — Furniture, Modern Furniture
Materials: 2 Expedit 2×4 Bookcases, 1 VIKA KAJ leg, 1 Lack shelf, 4 Capita legs
Description: When I first moved two years ago I purchased an Expedit 2×4 Bookcase and laid it on its side against my main wall because I liked that look. I had a Lack shelf of the same color from a previous apartment, so to add some storage I attached some Capita legs from the clearance section onto that and made a little top shelf.
Later on, I wanted more desk space and a well-coordinated living room/office, so I got an identical Expedit case, cut 45-degree angles at the ends of both long pieces, and put together an Expedit-based desk. A VIKA KAJ leg at the wall-facing corner keeps everything stable.
If you wish to pull off a similar hack, take plenty of time to measure the 45-degreee cuts, paint the interior connector pieces (you cram those into the honeycombed paper inside the cut shelves for stability and to connect it) before assembling the finished product. Also, measure the VIKA leg, as the desk will have to settle into place if put on carpet.
Altogether, I’m happy with the way this area looks, and even happier with the tons of workspace it affords me. The whiteboards on the walls are a big bonus, too. Just get some melamine panels at your local hardware store and anchor to suit.
See more photos of the Expedit desk.
~ Brad Czerniak, Canton, MI


Tags: bookcase, finished, whiteboards
July 11th, 2010 — Furniture, Modern Furniture
Materials: Jonas Secretary
Description: I wanted a cat cabinet to hold both the cat food and cat litter. I wanted the cat litter to be high enough so I wouldn’t have to bend over to clean it. I also wanted the cabinet to serve as a dark hiding space for my cats (they like to get away from the dogs every now and then). After being inspired by many of the Ikea hacks on this site, I took a trip to Ikea and found the Jonas Secretary.
I put the cabinet together using the Ikea directions and then proceeded to hack the product in the following way:
1. I decided the top “computer station” was the perfect place to put the litter, as I could easily slide it out onto the pull down door. I cut a hole on the bottom right hand side using an electric jigsaw. The original hole was not big enough for my fat cat  so I ended up cutting almost 1/3 of the shelf away. This allows my cats to drop from the top section of the cabinet into the top drawer.
2. I made an identical cut on the bottom left hand side of the top drawer, creating an opening into the middle drawer.
3. I cut an entry hole (about 5×7 inches) level with the second drawer. I nailed a picture frame I found for $3 at Target to the opening. Now the cats are able to climb into the second food drawer, up to the third napping drawer and then into the litter cabinet at the top.
4. Considering how heavy my cats are, I reinforced the two middle drawers by screwing two pieces of plywood (1/2 x 2 x 16 and 13/16 inches each) under each drawer to help support the bottom.
5. I used clear adhesive shelf liner in the litter cabinet area (along with some sealant) to help with cleanup.
6. Originally, I was just going to place the food dishes in the second shelf, but the space ended up being smaller than I thought. My current food dishes are metal with circular lips. I decided to cut circles out of the bottom of the second drawer to hold each dish.
7. I never liked the handles that came with the cabinet, so I just never put them on. I also thought the cabinet was too dark, so I affixed a mirror I bought at Ikea to the front door. This process was a little more intense than I originally thought, since the door is actually hollow. I cut the mirror to size, then GLUED and screwed the holders into place.
Overall, I’m really pleased with the outcome. Now I just hope my cats like it as well!
~ Teresa, Austin, TX


Tags: computer, Furniture, picture, result, sealant
July 11th, 2010 — Furniture, Modern Furniture
Materials: Skala Tray
Description: I liked the design of the tray, but I thought it was a little boring and I didn’t think the finish was very durable. I often eat at the coffee table especially when Glenn is gone so I thought a tray would be useful for carrying my dinner and glass of wine.
We have an entire drawer full of travel brochures, maps, tickets stubs and all sorts of Japanese memorabilia since we’ve lived here for 18 months. I thought it would be fun to use all of this to dress up the plain tray.
I used Modge Podge to glue down the paper scraps and then 5 coats of the Podge on top. Waiting for it to dry between each layer. I had high gloss Modge Podge so it has a glossy finish. I hope we have it for a long time and it reminds us of our time here.
See more of Kelly’s Japanese Skala tray.
~ Kelly, NAF Atsugi, Japan


Tags: amazon, brochures, Modern Furniture, sorts, travel
July 11th, 2010 — Furniture, Modern Furniture
Materials: VASTLIG
Description: This works best with younger plants, though I have transplanted full size plants into this upside-down configuration without too much problem.
Tools: Scissors, plant, dirt, boxboard or cereal box-type material-(you can use felt too.) A pole for hanging your plant.
1. Look at your plant and decide if you want to push the roots up through the bottom or if you want to push the plant down through the bottom.
2. Get you VASTLIG bag and cut a X on the bottom. It should be as wide as the branching leaves on your plant or the root ball. You don’t want to make this too big or the plant will fall out. But you can make your X smaller in the next step.
3. Cut the boxboard or felt to fit the bottom of the bag- it doesn’t have to fit exactly, but it must be a few inches bigger than the X. This is a collar.
4. Cut collar from the edge of the boxboard or felt to the center, and when you get to the center, cut a circle shape. Set this aside.
5. Now put your plant through, then grab your collar and nestle it down into the bag so it holds the roots and keeps them from falling out of the X.
6. Add dirt and water and you are done.
P.S. Ikea for City Gardening!
By looking at Ikea items in a different perspective, I have used them for my city garden.
VASTLIG- bag as upside-down planter
FNISS-waste basket as deep root planter
EVERT- as deep root planter
SMYCKA- tied together as plant supports
TROFAST- as shallow root planter
~ Ninjarita, Minneapolis


Tags: different, Furniture, material, result